Pita Garlic Cheese Triangles in Air Fryer: Crispy & Quick Snack!
Growing up, I was always just a few steps behind my mom in the kitchen, apron too big, eyes wide with curiosity, and a heart full of admiration. My mom didn’t just cook, she created meals that felt like warm hugs. Her kitchen was full of love, and every dish was a piece of her soul. After her passing, I felt lost, but I found comfort and connection through food. Cooking became my therapy, my tribute to her.
As I began sharing her recipes through Airfryer Diaries, I also started experimenting with quick and healthier options using one of my favorite tools: the air fryer. That’s how Pita Garlic Cheese Triangles in Air Fryer came to life, a recipe inspired by one of my mom’s simple oven snacks, modernized for today’s fast-paced kitchen.

It started on a casual night with leftover pita, garlic, and cheese. I tossed everything together, popped it into the air fryer, and what came out was magical, crispy edges, melted cheesy goodness, and that nostalgic comfort I’d been craving. Since then, these Pita Garlic Cheese Triangles in Air Fryer have become a staple in my home.
Whether you’re hosting guests, need a fast snack, or just miss a bit of homemade love, Pita Garlic Cheese Triangles in Air Fryer are the perfect fix, simple, flavorful, and filled with warmth. This recipe is more than just food, it’s a bite-sized memory of love.
Table of Contents
What Are Pita Garlic Cheese Triangles?
What Makes These Triangles So Popular?
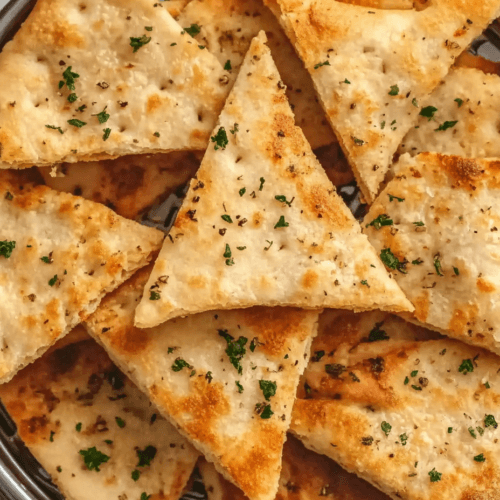
Pita Garlic Cheese Triangles in Air Fryer are a quick, crispy snack that brings bold flavor with almost no effort. You simply cut pita bread into triangles, brush them with garlic oil or butter, add cheese, and pop them into your air fryer. In minutes, you have golden, cheesy bites with crisp edges and soft centers.
What makes Pita Garlic Cheese Triangles in Air Fryer so irresistible is the perfect balance of texture and taste. The air fryer crisps up the pita without drying it out, while the garlic and cheese deliver comfort and flavor in every bite. It’s a snack that’s easy to make and even easier to love.
This recipe has become one of my go-to’s when I need something fast but satisfying. It’s also great for entertaining kids love them, guests devour them, and cleanup is simple. If you’re looking for fast ideas, try more from our best air fryer snacks list.
Why Use the Air Fryer Instead of the Oven?
Oven-baking works, but using the air fryer for Pita Garlic Cheese Triangles in Air Fryer saves time and amps up the crisp. You skip preheating, cut cook time in half, and avoid soggy results. The circulating heat gives every triangle even browning and that addictive crunch.
Want more sides that work with this snack? Don’t miss our guide on what to serve with air fryer wings.
Pita Garlic Cheese Triangles in Air Fryer are simple, delicious, and way too easy not to try trust me, you’ll be hooked after one bite.
Pita Garlic Cheese Triangles in Air Fryer
Ingredients
Main Ingredients
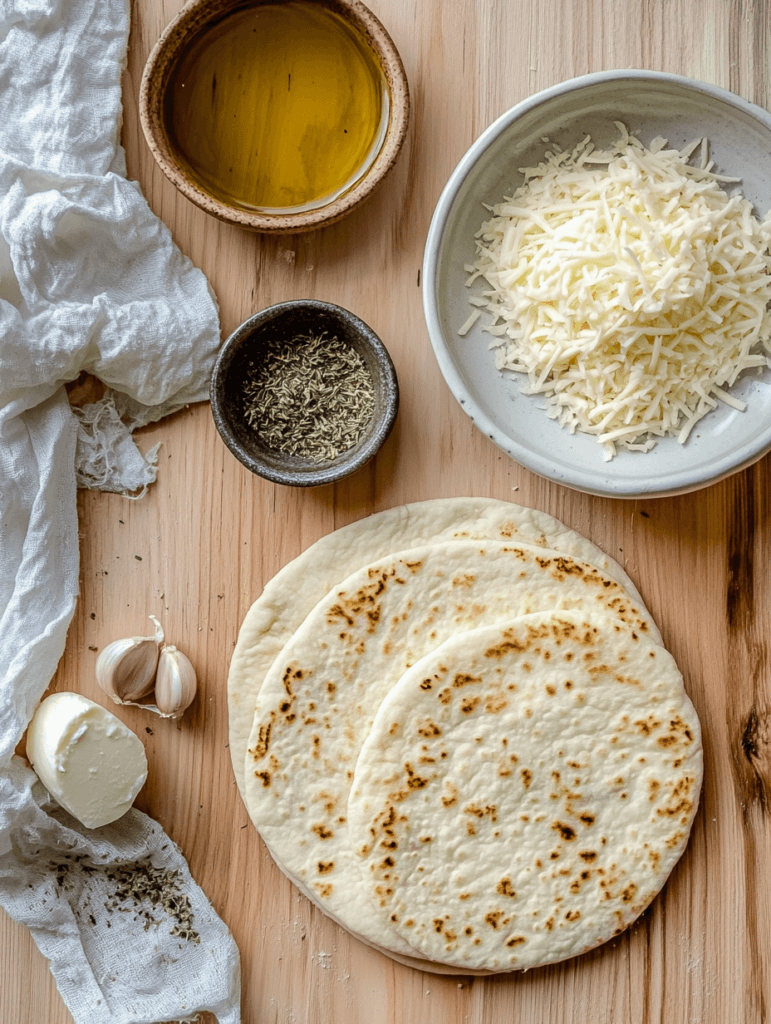
- 2 rounds pita bread (non-pocket) preferably day-old
- 1 cup shredded mozzarella
- 2 cloves garlic minced
- 2 tbsp olive oil or butter melted
- 0.5 tsp dried oregano optional
- 1 pinch salt
Instructions
- Preheat the air fryer to 375°F (190°C) for 2–3 minutes.
- Cut pita rounds into triangles (like pizza slices).
- Mix minced garlic with melted olive oil or butter.
- Brush the garlic oil mix generously over each pita triangle.
- Top with shredded mozzarella and a sprinkle of oregano and salt.
- Place in air fryer in a single layer and cook for 5–7 minutes or until cheese is bubbly and edges are golden.
Notes
Nutrition
Best Ingredients for Air Fryer Garlic Cheese Pita
Choosing the Right Type of Pita Bread for Air Frying
For perfect Pita Garlic Cheese Triangles in Air Fryer, your pita matters. Choose a soft, thick, non-pocket style it holds cheese better and crisps without cracking. Thin pita can work but tends to overcook fast. Whole wheat or low-carb pita is great if you’re looking for a healthier version without sacrificing crunch.
A day-old pita actually works better here less moisture, more texture. It gives you that ideal crispy bite with a chewy center.
For another spin, check out our garlic flatbread in air fryer a great variation using similar ingredients.
Top Cheeses That Melt Perfectly in Air Fryers
Mozzarella is your best bet for Pita Garlic Cheese Triangles in Air Fryer. It melts smooth and gives that stretchy finish. For a flavor boost, mix in cheddar or Parmesan. Love bold flavors? Try Monterey Jack or Gruyère.
Skip soft cheeses like feta before air frying they don’t melt well. Instead, sprinkle them on after cooking.
Want more low-guilt snack ideas? Explore healthy air fryer snacks for weight loss for inspiration.
How to Make Pita Garlic Cheese Triangles in Air Fryer
Step-by-Step Recipe for Garlic Cheese Pita Triangles
Making Pita Garlic Cheese Triangles in Air Fryer is incredibly easy and takes less than 10 minutes from start to finish. With just a few ingredients and a little prep, you’ll have a crispy, cheesy snack ready to serve.
Here’s what you’ll need:
| Ingredient | Quantity |
|---|---|
| Pita Bread (non-pocket) | 2 rounds |
| Shredded Mozzarella | 1 cup |
| Garlic (minced) | 2 cloves |
| Olive Oil or Butter | 2 tablespoons |
| Dried Oregano (optional) | ½ teaspoon |
| Salt | A pinch |
Instructions:
- Preheat your air fryer to 375°F (190°C) for 2–3 minutes.
- Cut pita rounds into triangles (like pizza slices).
- Mix garlic with melted butter or olive oil.
- Brush garlic oil mix on each triangle generously.
- Top with shredded cheese and a sprinkle of oregano.
- Air fry in a single layer for 5–7 minutes or until the cheese is bubbly and edges are golden.
That’s it! Your Pita Garlic Cheese Triangles in Air Fryer are ready to enjoy crunchy, cheesy, and full of flavor.
Want a twist? Add red pepper flakes or a dash of paprika for a spicy version. Or try sprinkling feta after cooking for a Mediterranean vibe.
Need more quick recipe ideas? Don’t miss our cheesy favorite air fryer cheesy tortilla garlic bread.
Prep Tips for Perfect Crispiness
For best results, don’t overcrowd the air fryer basket. Give the pita space so the hot air can crisp each triangle evenly. Also, use a light hand with cheese too much can drip and burn.
Always brush the garlic oil evenly. This not only boosts flavor but also gives you that irresistible crunch every time. Want a softer center? Use thicker pita. Prefer an all-crunch bite? Go with thin, crispy rounds.
Looking for more fun and tasty snacks? Try these top 5 trending air fryer recipes that everyone’s raving about.
Optimal Air Fryer Settings & Cooking Time
Temperature and Time Guide for Crispy Results
When making Pita Garlic Cheese Triangles in Air Fryer, set your temperature to 375°F. This hits the sweet spot: hot enough to melt the cheese and crisp the edges without burning. Cook them for 5 to 7 minutes, depending on your air fryer model and how crispy you like them.
Preheat your air fryer for 2–3 minutes for even results. Always lay triangles in a single layer for proper airflow and even browning.
Want more quick snacks after your cheesy triangles? Check out this air fryer mini cheesecake just as fast and satisfying.
How to Avoid Overcooking or Undercooking
Too much time? The garlic burns and the cheese hardens. Too little? Your triangles stay limp. Keep an eye on them after 5 minutes. Once the cheese is bubbly and golden, they’re ready.
Tips:
- Don’t overcrowd the basket.
- Use even triangle sizes.
- Watch the cheese bubbling is your visual cue.
Love cheesy snacks? Don’t miss air fryer crispy potato cheese bombs same cheesy crunch, different shape.
Dips & Sauces to Pair With Garlic Cheese Pita Triangles
Classic Dipping Sauces That Enhance Flavor
Pita Garlic Cheese Triangles in Air Fryer are great on their own, but even better with the right dip. Marinara, ranch, or garlic aioli are all perfect matches. Hummus also adds a creamy, earthy balance that complements the crispy texture.

Want something fun? Try a combo platter with a few dipping sauces to please everyone.
Craving more snacks that go great with dips? Don’t miss our cheesy taco pinwheels they’re a crowd favorite.
Creative Dip Ideas for Picky Eaters
For kids or picky eaters, keep it simple: pizza sauce, honey mustard, or a ranch-yogurt mix. These mild dips pair perfectly with the bold garlic flavor.
Serve Pita Garlic Cheese Triangles in Air Fryer with a healthy twist by adding a creamy avocado toast spread on the side.
In the end, these crispy triangles are all about flavor, fun, and dipping joy.
Common Mistakes to Avoid When Air Frying Pita Triangles
Skipping the Oil Spray: Why It Matters
One of the most common mistakes with Pita Garlic Cheese Triangles in Air Fryer is forgetting a light spray of oil. Without it, the triangles can dry out or cook unevenly. A quick mist of olive oil ensures golden, crispy edges and better texture overall.
Also, don’t forget to preheat your air fryer. Starting cold can leave the bottom soggy.
Overstuffing the Air Fryer Basket: Big No!
Avoid overcrowding it’s a fast way to get uneven cooking. Always place the triangles in a single layer. If you’re making a big batch, cook in rounds for best results.
Another mistake? Using too much cheese. It might melt over the edges and burn.
For more crispy snack tips, check out these air fryer zucchini chips perfectly light and crunchy when spaced out right.
Or explore top 5 trending air fryer recipes for more quick wins like these cheesy triangles.
Pita Garlic Cheese Triangles in Air Fryer are easy, but a few small tweaks make a big difference.
Conclusion
Pita Garlic Cheese Triangles in Air Fryer are quick, crispy, and full of flavor. With just pita, cheese, and garlic, you’ve got a snack that feels homemade and comforting in under 10 minutes.
They’re perfect for dipping, sharing, or enjoying solo, and so easy to make again and again. Simple, fast, and totally satisfying.
Want more air fryer favorites? Don’t miss these best air fryer chicken recipes for your next meal idea.
No doubt, Pita Garlic Cheese Triangles in Air Fryer will earn a permanent spot in your snack rotation.
FAQ: Pita Garlic Cheese Triangles in Air Fryer
Can I use pita bread in the air fryer?
Yes! For Pita Garlic Cheese Triangles in Air Fryer, use thick, non-pocket pita. It holds cheese well and crisps up without breaking.
What cheese works best with pita?
Mozzarella is ideal. For more flavor, mix in cheddar or Parmesan. Just don’t overload too much cheese can burn.
Looking for another cheesy snack? Try our air fryer cheesy tortilla garlic bread.
How long do I cook pita triangles in the air fryer?
Cook at 375°F for 5–7 minutes. Once the cheese bubbles and edges turn golden, they’re ready.
What dips go well with cheesy pita triangles?
Classic dips like marinara, ranch, or garlic aioli pair perfectly. Hummus or even honey mustard works great too.
Pita Garlic Cheese Triangles in Air Fryer taste amazing solo but are even better with dips.
Want more air fryer recipes? follow me in pinterest and Facebook

